PLM - Getting Started
Below is a group of How-to's that are related to the topic of 'Installation & Access' in the PLM - Getting Started subcategory. Click on their links to find more information on these topics.
Below is a group of How-to's that are related to the topic of 'Search, Navigation & Open' in the PLM - Getting Started subcategory. Click on their links to find more information on these topics.
Below are the remaining How-to's that are not present in other subgroups in the PLM - Other subcategory. Click on their links to find more information on these topics.
Before working in the PLM please follow the available training material depending on your usage and requirements. The trainings can be found here.
Below is a list of acronyms that are used in relation to the PLM.
- BOM – Bill of Materials
- CDR – CERN Drawing Reference → Replaces CDD Number
- DC – Design Code
- Doc – Document
- DT – Digital Twin
- LC – Lifecycle
- PC – Profile Card
- PWB – PDM Workbench (PLM-CATIA connector)
- QAC – Quality Assurance and Control
- RFC – Ready for Check
- RFC in PLM – Ready for Check in PLM
- RPG – Responsible Project Group
- TBE – Titleblock Editor
- TOC – Table of Contents
- WF – Workflow
- Pre-migrated – SmarTeam documents are now available in the PLM, but still owned by SmarTeam
- Migrated – Documents have been pre-migrated and changed ownership to the PLM.
See the list of CATIA Acronyms here.
See the list of SmarTeam Acronyms here.
To access CATIA via the PLM please press the CATIA icon in the top right of the dashboard screen.
Access to the CATIA connector is granted on request, therefore if you have not already done so please complete this form to work with CATIA. Prior to granting you access, we would ask for you to complete the relevant training, please see a link to the learning path to find the best suited course for you. Once you have been granted access you will have to download the required programs from CMF.
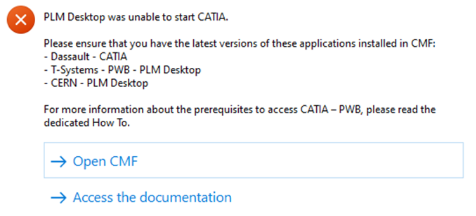
If you do not have the connector installed, or it is an out of date version, you will receive the following message when attempting to launch CATIA through the button on the PLM dashboard. This will remind you which applications must be installed and a link to CMF. There is also a link to documentation explaining the prerequisites required before running this application.
If CATIA is not installed the launch button will be greyed out.
To change the Design Code assigned to a Part follow the steps below:
- Switch to Edit Mode by clicking the "Edit" button located in the top-right corner of the Profile Card.
- Select inside the Design Code box (not on the icon). This will open a new dialog displaying all the Design Codes for which the user has Contributor rights in.
- Choose the Design Code from the list and click on "Save" on the Profile Card to apply the new one.
Note, in Edit mode, the icon next to the Design Code field opens the current Design Codes profile card. It cannot be used to search and select a new code.
Note:
If you would like to learn more about how to propagate the Design Code to BOM dependencies, please check the link below:
How to add and propagate the Design Code?
The dashboard is the main page you will be greeted with when you open the PLM, it contains a search table.
The images below explain the different options and filters you can use to enhance your search.
This page will search for all items types:

You can also narrow down the search straight away by selecting one of the specific item type tabs.

![]() Search Navigation and preferences in the PLM
Search Navigation and preferences in the PLM
See other 'searching' how-tos here
The PLM can be opened through the Desktop app or in a web browser. The table below details the supported web browsers for different operating systems.
| Operating System | Supported Browsers |
| Windows 10 | • Edge • Firefox 78 ESR or 91 ESR • Chrome 103 (minimum) |
| Windows 11* | • Edge • Firefox 78 ESR or 91 ESR • Chrome 103 (minimum) |
| MacOS 10.15 Catalina | • Firefox 78 ESR or 91 ESR • Chrome 103 (minimum) |
* Whilst the PLM is supported in windows 11, CATIA currently is not. Therefore, if you need to use CATIA for any reason please ensure you are running windows 10.
Icons are used throughout the PLM and in the CATIA specification tree to quickly convey information. See the documentation below to find the explanation of each icon.
More: FAQ
Please follow the necessary training before using the PLM. You can access the training and learning path here, this will help you identify what training is necessary for you depending on your previous experience and knowledge.
Training on the CATIA-PLM connector (PWB) is a prerequisite to being granted access to CATIA via the PLM. Once you have completed the training please complete this form to request access to the PLM and CATIA connector.
Prior to having the access rights, you will receive an error message when attempting to launch CATIA, and you will not be able to view the connector package in CMF. Please complete the form above.

If you would like a refresher after completing the training please see the document at the bottom of this page, it explains the basic concepts to help you get started. Also see the video below which walks you through the basics steps of using the CATIA connector, such as opening and saving a document.
For more information on some of the steps covered in this video, please see these dedicated how-to's.
- How to access CATIA via the PLM?
- What's the difference between the different CATIA configurations?
- How to search using the PLM dashboard?
- How to open a CAD document from the PLM?
- How to open a CAD document from CATIA using the connector?
- How to save a new CAD document in the PLM from CATIA?
- How to book a specific CERN Drawing Reference before the creation of the Drawing?
- How to set an existing CERN Drawing Reference (CDR) to a new Drawing?
More: FAQ
The Parts are the group of responsible objects for storing all engineering information related to the equipment like 2D, 3D or other documents and files. However, the Part does not contain any files: the files must be attached to the CAD or non-CAD Documents.
In the PLM Platform the Part can be linked to a second Part, but CADs and Documents can be attached only to one Part.
In the Parent Part it is possible to link several Children: Parts (BOM), CAD Documents and Documents.
The Part can be created manually from the PLM Platform or automatically through connector.
Read More: Part
To log-out from PLM Desktop you need to click on the button that represents your account (step 1) and use the "Logout" (2).
Then you need to wait for confirmation window that appears and validate.
CERN account holders can access the PLM with their nice CERN account.
The platform has a table of contents (TOC) on the left hand side. From here you can find all the options to navigate through the PLM to search and create objects.
The platform is navigated using tabs. Every time you open a document, a search or a link, a new tab opens next to the tabs that are already open.
It is largely the same for the four most common types of objects: parts, documents, CAD documents and folders. The menu also exists for other types of objects.
For more information on how to navigate around the PLM interface, and the icons used see the following FAQ.
There are several ways to access the search page, if you want to know more about this procedure, please follow the document below (page 7).
![]() Search Navigation and preferences in the PLM
Search Navigation and preferences in the PLM
See other 'searching' how-tos here
To open the quick search function, first open the Navigation Panel, then select the icon corresponding to the type of object you are looking for or use one of the shortcuts in the sidebar.
The quick search can be used to find an object if you know its reference parameter. This means that the quick search only works if you type in the first character(s) of the reference parameter.
![]() Search Navigation and preferences in the PLM
Search Navigation and preferences in the PLM
See other 'searching' how-tos here
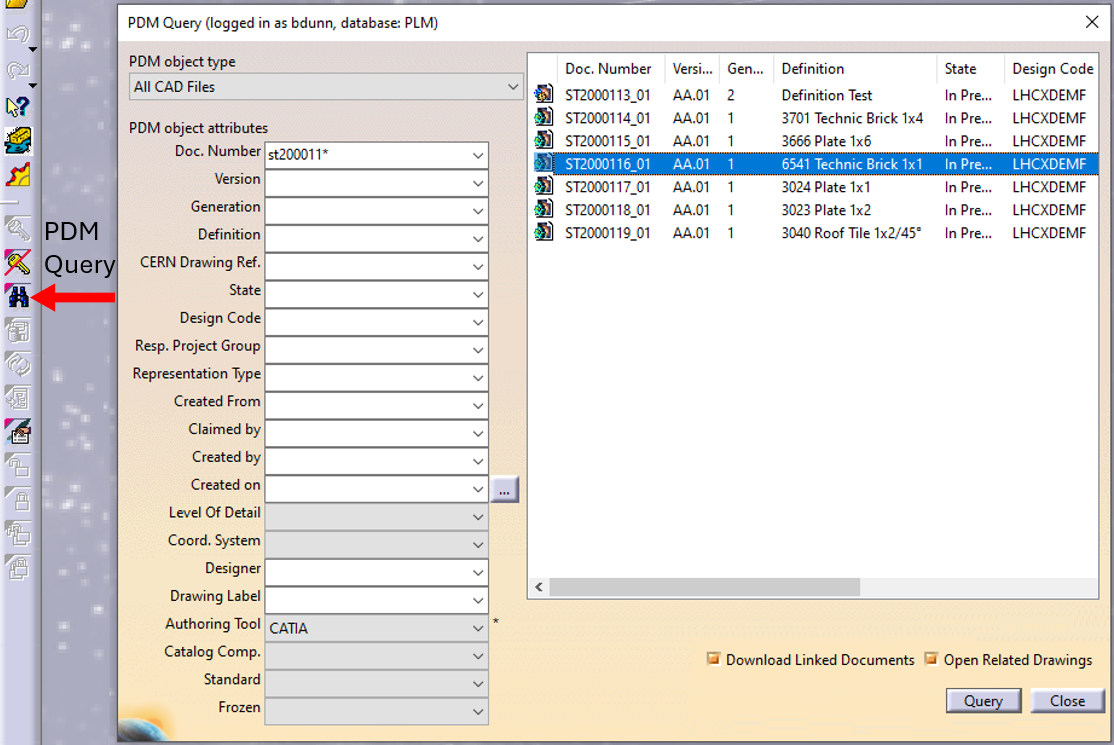
In CATIA, from the connector toolbar, clicking on the Query icon, you will be able to access the PDM Query dialog and to search for any CAD document previously uploaded to the PLM platform. Once the searched CAD Document has been found and selected, a double-click will open it in CATIA.
Note that the double-click corresponds to an Open as Current.

See the 'Opening' subgroup for related information
See more: Open CAD Document in CATIA
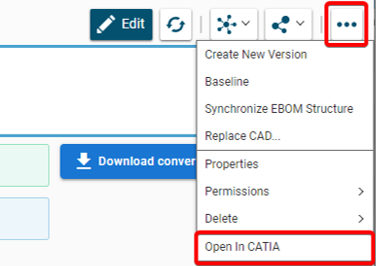
Any CATIA document saved in the PLM platform can be opened from there directly in CATIA. There are various methods, see below:
- From Profile card header

- From the PLM dashboard

- From the CAD Document Profile Card.

- From the profile card more menu

- From a search result grid, using the contextual menu.

See the 'Opening' subgroup for related information
See more: Open CAD Document in CATIA
For support, please send an email to plm-support@cern.ch.
A request will be automatically created in the Service-Now Platform. For urgent/blocking issues, please call the hotline: 160660
For CAD designers, it is also possible to report an issue from the PLM desktop application.
This way, the request created in Service Now will already contain some useful information for the PLM Support Team (PC name, date and time when the applications were launched, CATIA active document reference …).
This is the way to report the problems to be privileged.
Access to the CATIA connector is granted on request, therefore if you have not already done so please complete this form to work with CATIA. Prior to granting you access, we would ask for you to complete the relevant training, please see a link to the learning path to find the best suited course for you.
Once your computer is added in the NSC (to complete this process, the admin or the main user of the computer must accept a request sent via email), you will be able to install the CATIA connector via the CERN CMF installation manager, through the icon as shown in the image below.
Note that only Windows 10 physical machines managed by CMF are eligible for CATIA V5 installation.
